This page will give you a step-by-step guide about accessing the subject progress evenings, as well as links to get your device ready and a video guide to show the process in action. The events utilise School Cloud and instructions are below.
The dates for 2025/2026 are as follows:
- Year 7 - Meet the Tutor - Wednesday 8th October 2025 (a single appointment 4:00pm - 7:00pm, at Noadswood)
- Year 7 - Wednesday 17th June 2026 (appointments between 4:00 - 8:00pm, virtually)
- Year 8 - Wednesday 13th May 2026 (appointments between 4:00 - 8:00pm, virtually)
- Year 9 - Wednesday 12th November 2025 (appointments between 4:00 - 8:00pm, virtually)
- Year 10 - Wednesday 22nd April 2026 (appointments between 4:00 - 8:00pm, virtually)
- Year 11 - Wednesday 21st January 2026 (appointments between 4:00 - 8:00pm, virtually)
Next Event: Year 10 Subject Progress Event
Wednesday 22nd April 2026 (4:00pm - 7:00pm)
This event is online, with bookings via School Cloud.
Booking opens via School Cloud: Wednesday 15th April 2026 (8.00pm) - parents and carers, please do not double book appointments (please all join each teacher as a family).
Accessing Online Subject Progress Events
Parents and Carers can access the live booking forms via the School Cloud link: https://noadswood.schoolcloud.co.uk
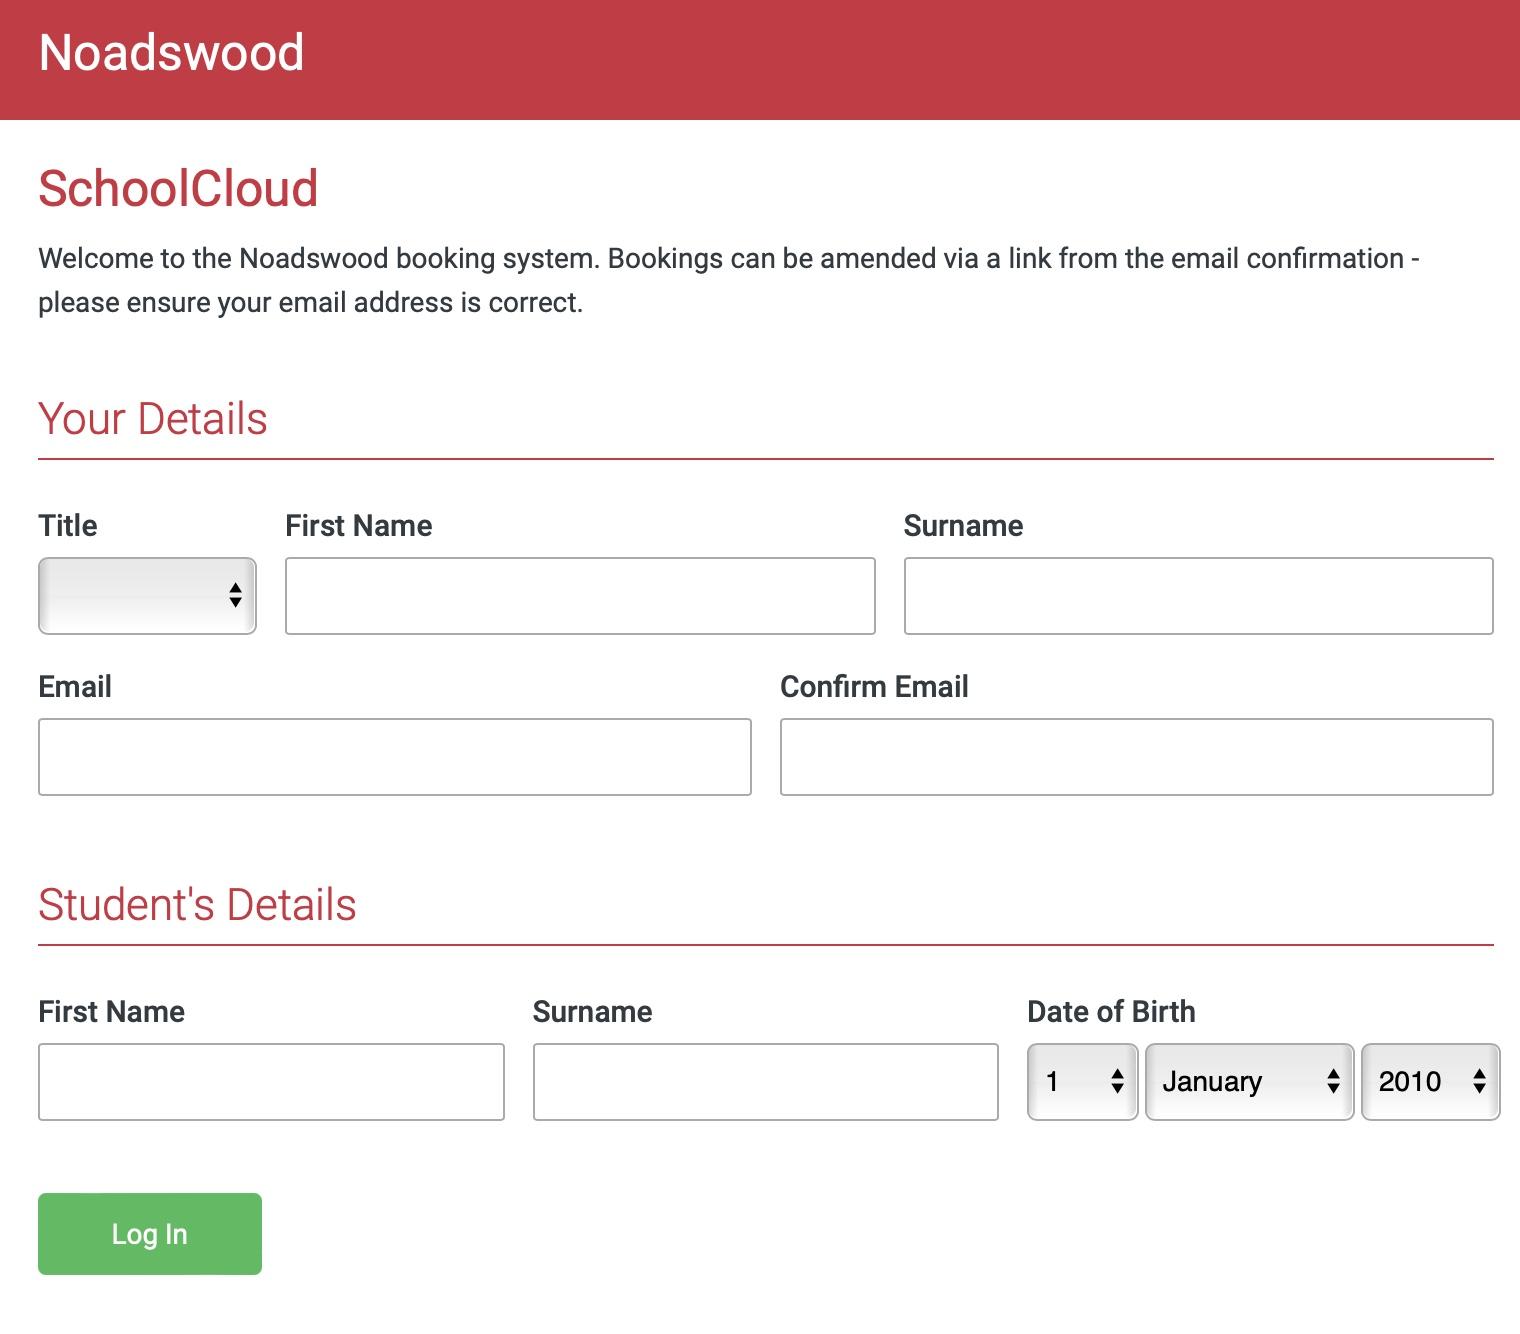
You'll need to enter some basic details, including the email you have registered with the school. You'll then need to enter your child's name as well as their date of birth.
When logged in you can select automatic appointment creation or manual specific teacher creation, followed by the times you're available. Using the same link above, the event will then run on the evening scheduled and automatically take you to all bookings that have been made.
Guide
Detailed instructions can be found using the School Cloud link: https://support.parentseveningsystem.co.uk/category/411-parent-logins
Video Guide
A video guide of the process is shown below:
In order to make video calls you need to have as a minimum:
- a device with a microphone and speaker/headphones
- a compatible up-to-date web browser:
iPhone/iPad: Safari Note: there is a known issue joining video calls using iOS 14.2. Please upgrade any iOS 14.2 devices to iOS 14.3, or use an alternate device.
Android: Chrome or Firefox - please note that Samsung phones often default to using the Samsung Browser, this is not supported.
Windows: Chrome, Firefox or Microsoft Edge (Chromium - download here)
Mac: Safari, Chrome or Firefox
Linux: Chrome or Firefox
We also recommend:
- Using your smartphone for video appointments. If you don't have a smartphone with a front-facing camera, use a laptop or computer with a webcam.
- Using a headset (or earphones with a microphone) to reduce echo.
How to attend your appointments via video call
1. Log in and go to the Evening
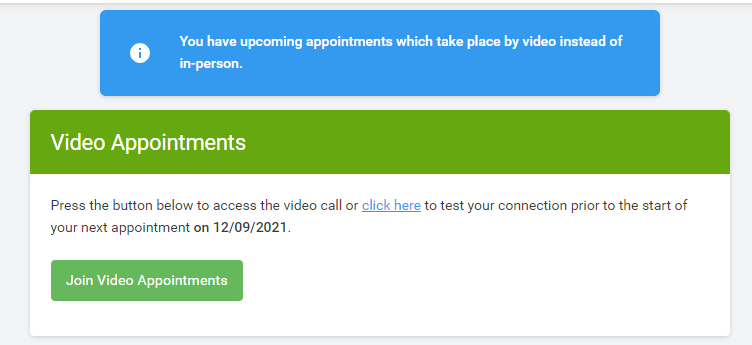
On the day of the video appointments (or before, if you want to test your camera and microphone, etc) login to Parents Evening at the usual web address for your school, or click the login link from the bottom of the email confirmation you will have received.
At the top of the page you will see a blue notice telling you that you have upcoming video appointments, as well as a "click here" link which allows you to check that your internet connection and device can successfully connect to a video call.
The green Join Video Appointments button allows you to join your appointment on the day - or to test your camera/microphone at any time.
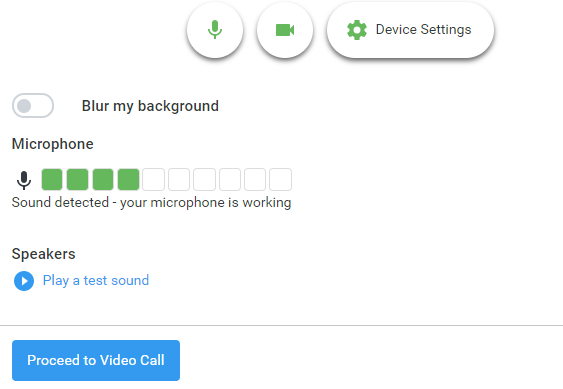
2. Check Audio and Video
When you click Join Video Appointments the Check Audio and Video screen will be displayed. You may at this point be asked if you wish to allow access to your camera/microphone, in which case please click yes.
From here you can blur your background in video calls (please note that, as of 15th September 2021, the ability to blur the background whilst in video calls is currently unavailable whilst we work on improvements. This note will be removed when it becomes available again.), turn on or off your microphone and camera, change which devices are being used for the call, and check your microphone and speakers. Once you are happy, click Proceed to Video Call.
3. The Video Call
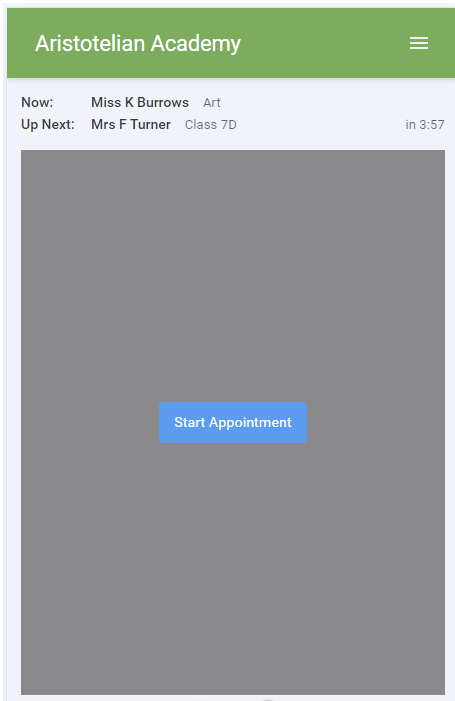
On this screen you can see the following, when in a call:
- At the top left the teacher name (and subject details) for the current and next appointment
- At the top right a countdown to the start of the appointment.
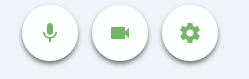
- At the bottom the control buttons allow you to mute the mic or turn off the camera. The cogwheel allows you to change the settings, such as blurring your background, or choosing to use a different mic or camera (if you have more than one available).
When another person is available these also show a pick up button to start the call

and a hang up button to leave the call.

In the middle, when your appointment is due to start, the Start Appointment button.
4. Making a call
Click the Start Appointment button. You will see yourself in the bottom right corner of the screen (unless you have no camera, or have chosen to turn it off). If the teacher has not yet joined you will see a notice to that effect in the centre of the screen.
When a teacher joins a call you will see them in the main part of the screen - or hear them, if they have no camera (or have turned it off) - and can start your discussion with them.
You will also see the remaining time for the appointment counting down in a blue bar at the top of the screen, which will turn red when the last 10 seconds begin.
If anyone loses access to the system for some reason during the call, they can log in again and click Start Appointment on the video call screen. As long as the other person is still in the call this will let you continue with the appointment.
When the countdown in the blue bar stops the appointment time is over and the call will automatically end.
Note that if you or the teacher are late, or leave and rejoin the call, it does not reset the timer.
The appointment will always end at the scheduled time.
5. Follow on calls
If you have a consecutive appointment scheduled the screen will display a Start Next Appointment button. When you are ready to proceed, click on it
Note that if you delay starting a call it does not extend the duration for that appointment.
The appointment will always end at the scheduled times.
If you do not have a consecutive appointment, but you have not completed your final scheduled appointment you will see a countdown telling you how long until the start of your next appointment.
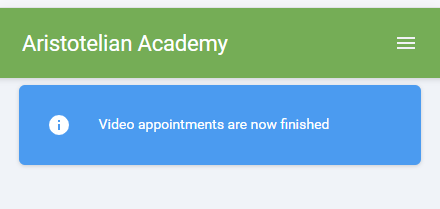
Once your final appointment for the evening is complete you will see a message advising you of this.
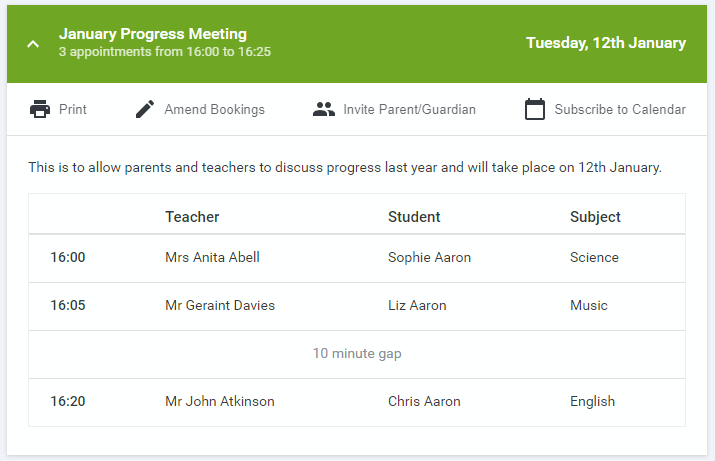
6. Inviting another parent/guardian to join your appointments
You can give ONE other parent/guardian access to join your video appointments in respect of each student linked to you that is involved in the conference. You can grant this access at the time of booking, or later if required.
1. Once you have made your bookings (or when you later log in and go to My Bookings) click on the Invite Parent/Guardian link at the top of the list of your bookings. If you have already sent an invitation this link will show as Manage Invites instead.
2. You will then be presented with a box asking for the details of the parent/guardian to be given access.
If there is more than one student linked to you and involved in the evening they will all be shown.
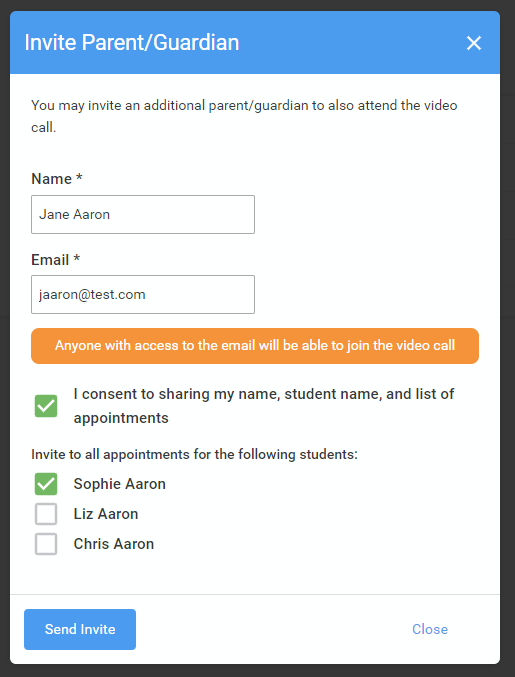
You must enter a Name, and an Email address, as well as tick the box to consent to that person being given access to the information used to make the appointments.
If there is more than one student linked to you, choose the student(s) in respect of whose appointments the access to this person will be granted.
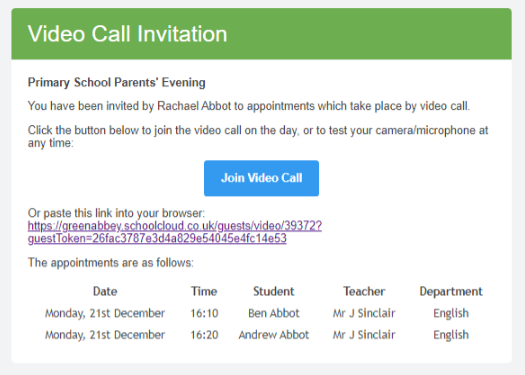
When you click the blue Send Invite button an email is sent to the address entered, giving them a link and details on how to join the call.
Please note that ONLY that one invited guest should use this link. Anyone else using it (including the parent that sent the invite, who should log in via their own confirmation email) will knock the guest out of appointments.
Here is an example of what the invite email looks like:
3. You will then see a Manage invites box that shows your sent invitation(s), allows you to add another invite if you have any more available (you can have one invite per student, if wished), and allows you to Resend invites or Remove them. If you have no more invitations available the green button will be replaced with a message that says Unable to invite another parent/guardian. Only one invite can be sent per student.
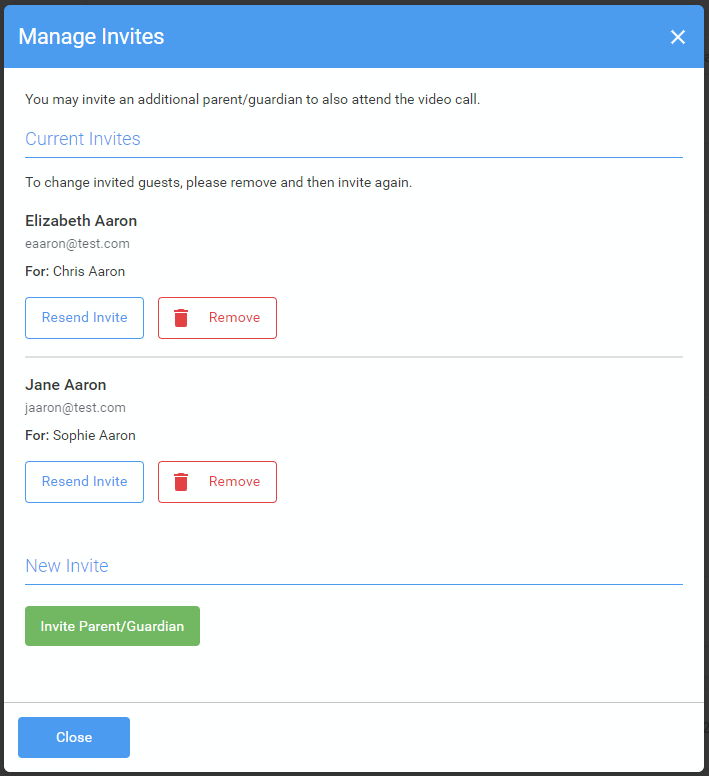
If you click Remove the link in the previously sent invitation will no longer work and that person can no longer join the video call.
Note that a call can have a maximum of 4 people in it at any one time. A school can assign 3 teachers to take joint appointments for a class, if they do this the parent can still invite their ONE guest, however once the number of active participants in the call reaches 4 no further people can join it (unless one of the existing participants leaves the call).